一款轻量级的ORM框架。
MyBatis 的优点
- 封装底层乏味的JDBC操作,让开发中更关注业务。
- SQL语句写在XML里和代码分离,便于维护,低耦合。
MyBatis 的缺点
- 相比全自动的hibernat, SQL编写工作量大。
- 对数据库SQL依赖比较强,移植性差。
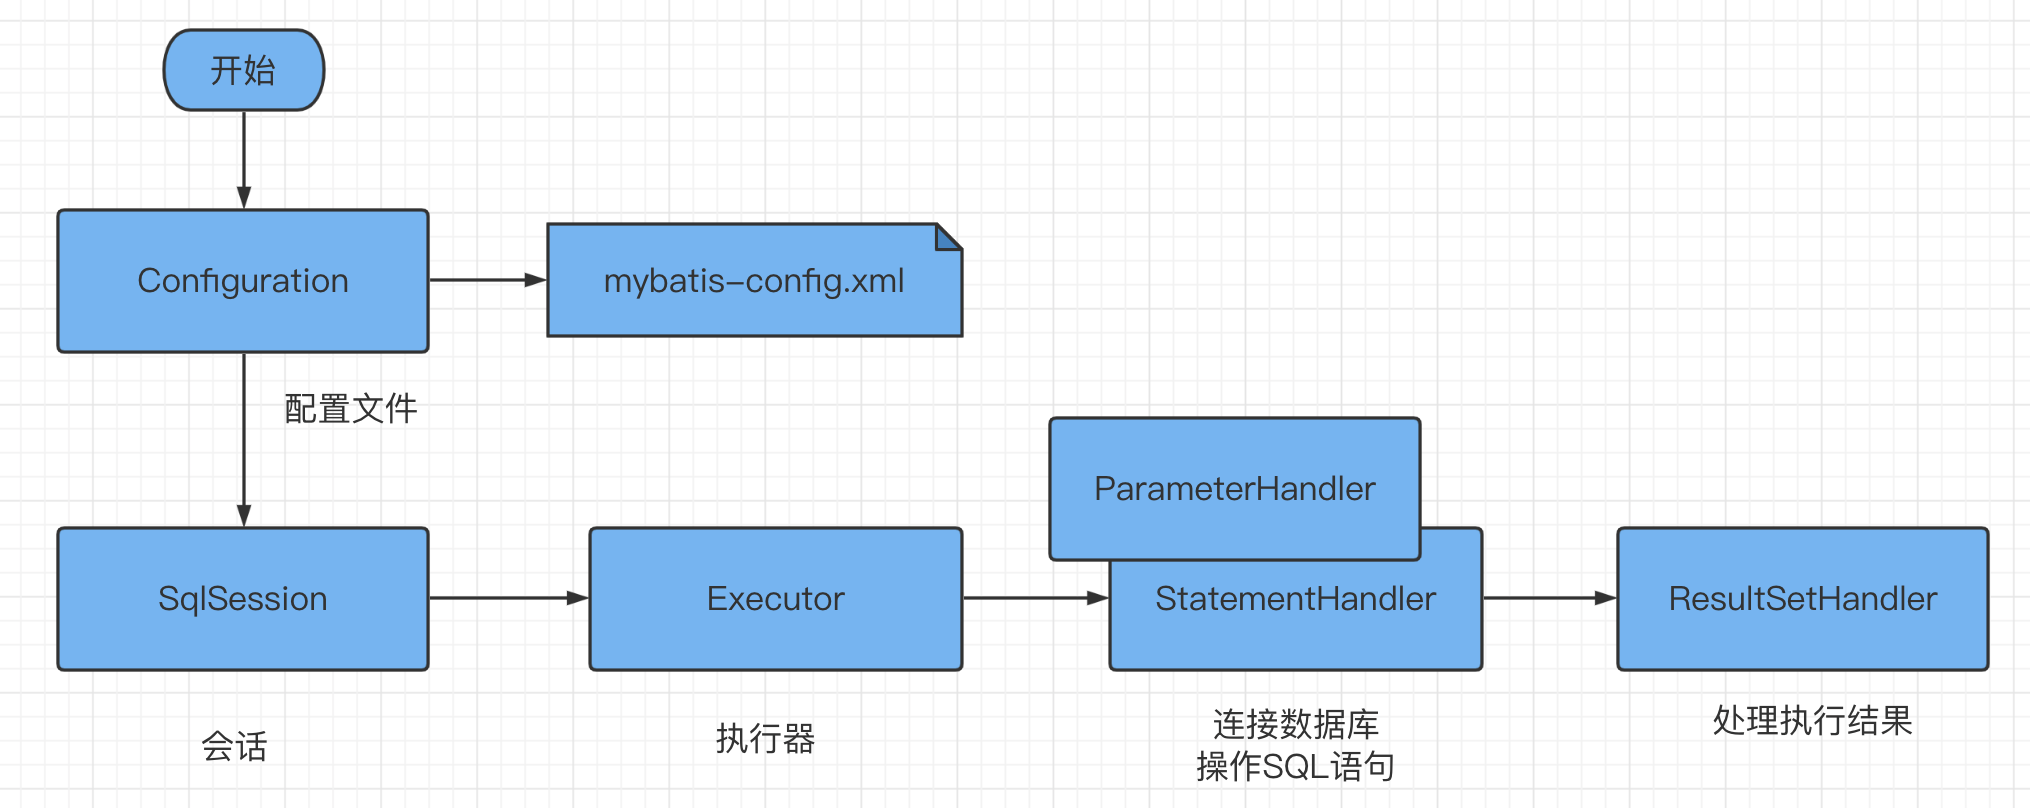
MyBatis 核心组件
Configuration
配置类,MyBatis启动是会解析全局配置文件全局配置文件 mybatis-config.xml及所有的 XXXMapper.xml文件,解析结果存入Configuration对象中,该对象是单例的,存在会话的上下文,贯穿这个MyBatis的执行过程。
SqlSession
SQL执行的顶层接口,定义了和数据库交互的所有方法,有CRUD及开始事务、提交事务、回滚事务等,有一个默认的实现类 DefaultSqlSession,持有Configuration和Executor对象,SqlSession本身没有做多少有用的事,具体的SQL语句执行委托给了Executor执行。
Executor
执行器,实现了SqlSession定义的SQL操作方法,实现了MyBatis的一级缓存,具体的SQL执行委托给它的下一级 StatementHandler。
StatementHandler
真正和数据交互的对象,实现了执行SQL语句,自身持有ParameterHandler和ResultSetHandler对象。
ParameterHandler
负责参数解析。
ResultSetHandler
负责处理SQL执行结果。
以上是MyBtais重要的几个组成部件,下面分析一下具体的源码执行流程。
MyBatis 源码分析
从Configuration配置解析开始
实例如下:
1
2
3
4
5
6
7
8
|
public static void main(String[] args) throws IOException {
  String resource = "mybatis-config.xml";
  InputStream inputStream = Resources.getResourceAsStream(resource);
  SqlSessionFactory sqlSessionFactory = new SqlSessionFactoryBuilder().build(inputStream);
  SqlSession session = sqlSessionFactory.openSession();
  Blog blog = session.selectOne("com.example.mapper.BlogMapper.selectBlog", 1);
  System.out.println(blog);
}
|
从 new SqlSessionFactoryBuilder().build(inputStream) 入手解读配置解析
 1
 2
 3
 4
 5
 6
 7
 8
 9
10
11
12
13
14
15
16
17
18
|
  public SqlSessionFactory build(InputStream inputStream) {
     return build(inputStream, null, null);
  }

  public SqlSessionFactory build(InputStream inputStream, String environment, Properties properties) {
    try {
      XMLConfigBuilder parser = new XMLConfigBuilder(inputStream, environment, properties);
      return build(parser.parse());
    } catch (Exception e) {
      throw ExceptionFactory.wrapException("Error building SqlSession.", e);
    } finally {
      //...
    }
  }

  public SqlSessionFactory build(Configuration config) {
    return new DefaultSqlSessionFactory(config);
  }
|
关键方法 parser.parse(), 这里完成了所以配置文件的解析。
 1
 2
 3
 4
 5
 6
 7
 8
 9
10
11
12
13
14
15
16
17
18
19
20
21
22
23
24
25
26
27
28
29
30
31
32
33
34
35
36
37
38
39
40
41
42
43
44
45
|
// 解析配置
public Configuration parse() {
  //... 省略
  parseConfiguration(parser.evalNode("/configuration"));
  return configuration;
}

// 解析配置
private void parseConfiguration(XNode root) {
  try {
    //分步骤解析
    //issue #117 read properties first
    //1.properties
    propertiesElement(root.evalNode("properties"));
    //2.类型别名
    typeAliasesElement(root.evalNode("typeAliases"));
    //3.插件
    pluginElement(root.evalNode("plugins"));
    //4.对象工厂
    objectFactoryElement(root.evalNode("objectFactory"));
    //5.对象包装工厂
    objectWrapperFactoryElement(root.evalNode("objectWrapperFactory"));
    //6.设置
    settingsElement(root.evalNode("settings"));
    // read it after objectFactory and objectWrapperFactory issue #631
    //7.环境
    environmentsElement(root.evalNode("environments"));
    //8.databaseIdProvider
    databaseIdProviderElement(root.evalNode("databaseIdProvider"));
    //9.类型处理器
    typeHandlerElement(root.evalNode("typeHandlers"));
    //10.映射器
    mapperElement(root.evalNode("mappers"));
  } catch (Exception e) {
    throw new BuilderException("Error parsing SQL Mapper Configuration. Cause: " + e, e);
  }
}
// 解析 properties 节点。
private void propertiesElement(XNode context) throws Exception {
  if (context != null) {
    //...省略
    parser.setVariables(defaults);
    configuration.setVariables(defaults);
  }
}
|
parse方法最终调用parseConfiguration解析不同的节点,比如解析properties节点,把解析出来的结果设置到 configuration配置文件中,到此配置解析结束。
selectOne 一条SQL语句是如何执行
从获取SqlSession对象开始,前面已经完成了配置解析,下面先看下如何生成SqlSession对象。
先用解析好的Configuration对象生成SqlSessionFactory。
1
2
3
|
public SqlSessionFactory build(Configuration config) {
    return new DefaultSqlSessionFactory(config);
  }
|
再调用 openSession() 生成 SqlSession
 1
 2
 3
 4
 5
 6
 7
 8
 9
10
11
12
13
14
15
16
17
18
19
20
21
22
23
24
|
public SqlSession openSession() {
    return openSessionFromDataSource(configuration.getDefaultExecutorType(), null, false);
  }

private SqlSession openSessionFromDataSource(ExecutorType execType, TransactionIsolationLevel level, boolean autoCommit) {
    Transaction tx = null;
    try {
      final Environment environment = configuration.getEnvironment();
      final TransactionFactory transactionFactory = getTransactionFactoryFromEnvironment(environment);
      //通过事务工厂来产生一个事务
      tx = transactionFactory.newTransaction(environment.getDataSource(), level, autoCommit);
      //生成一个执行器(事务包含在执行器里)
      final Executor executor = configuration.newExecutor(tx, execType);
      //然后产生一个DefaultSqlSession
      return new DefaultSqlSession(configuration, executor, autoCommit);
    } catch (Exception e) {
      //如果打开事务出错,则关闭它
      closeTransaction(tx); // may have fetched a connection so lets call close()
      throw ExceptionFactory.wrapException("Error opening session.  Cause: " + e, e);
    } finally {
      //最后清空错误上下文
      ErrorContext.instance().reset();
    }
  }
|
使用 DefaultSqlSession 实例化SqlSession对象,这里需要传入执一个执行器对象Executor。
执行器 Executor 实例化,直接Configuration类中的newExecutor方法产生。
 1
 2
 3
 4
 5
 6
 7
 8
 9
10
11
12
13
14
15
16
17
18
19
20
21
22
|
  //产生执行器
  public Executor newExecutor(Transaction transaction, ExecutorType executorType) {
    executorType = executorType == null ? defaultExecutorType : executorType;
    //这句再做一下保护,囧,防止粗心大意的人将defaultExecutorType设成null?
    executorType = executorType == null ? ExecutorType.SIMPLE : executorType;
    Executor executor;
    //然后就是简单的3个分支,产生3种执行器BatchExecutor/ReuseExecutor/SimpleExecutor
    if (ExecutorType.BATCH == executorType) {
      executor = new BatchExecutor(this, transaction);
    } else if (ExecutorType.REUSE == executorType) {
      executor = new ReuseExecutor(this, transaction);
    } else {
      executor = new SimpleExecutor(this, transaction);
    }
    //如果要求缓存,生成另一种CachingExecutor(默认就是有缓存),装饰者模式,所以默认都是返回CachingExecutor
    if (cacheEnabled) {
      executor = new CachingExecutor(executor);
    }
    //此处调用插件,通过插件可以改变Executor行为
    executor = (Executor) interceptorChain.pluginAll(executor);
    return executor;
  }
|
Configuration 中配置默认执行器类型是 ExecutorType.SIMPLE,对应的执行器是SimpleExecutor,由于一级缓存cacheEnabled开关状态默认为true, 最终生成的执行器是 CachingExecutor。
到此,SqlSession对象已经有,下面看一条SQL语句的执行过程。
执行SQL语句
1
2
|
Blog blog = session.selectOne("com.example.mapper.BlogMapper.selectBlog", 1);
System.out.println(blog);
|
 1
 2
 3
 4
 5
 6
 7
 8
 9
10
11
12
13
14
15
16
17
18
19
20
21
22
23
24
25
26
27
28
29
30
31
32
33
34
35
36
|
public class DefaultSqlSession implements SqlSession {

    // 第一步
    @Override
    public <T> T selectOne(String statement, Object parameter) {
      List<T> list = this.<T>selectList(statement, parameter);
      if (list.size() == 1) {
        return list.get(0);
      } else if (list.size() > 1) {
        throw new TooManyResultsException("Expected one result (or null) to be returned by selectOne(), but found: " + list.size());
      } else {
        return null;
      }
    }

  		// 第二步
      @Override
      public <E> List<E> selectList(String statement, Object parameter) {
        return this.selectList(statement, parameter, RowBounds.DEFAULT);
      }

      // 第三步
  		@Override
      public <E> List<E> selectList(String statement, Object parameter, RowBounds rowBounds) {
        try {
          //根据statement id找到对应的MappedStatement
          MappedStatement ms = configuration.getMappedStatement(statement);
          //转而用执行器来查询结果,注意这里传入的ResultHandler是null
          return executor.query(ms, wrapCollection(parameter), rowBounds, Executor.NO_RESULT_HANDLER);
        } catch (Exception e) {
          throw ExceptionFactory.wrapException("Error querying database.  Cause: " + e, e);
        } finally {
          ErrorContext.instance().reset();
        }
      }
}
|
从上面代码看到,selectOne查查最终委托各Executor对象的query方法来完成。
继续,Executor#query
前面在实例化Executor是我们已经知道最后生成的执行器是CachingExecutor。
 1
 2
 3
 4
 5
 6
 7
 8
 9
10
11
12
13
14
15
16
17
18
19
20
21
22
23
24
25
26
27
28
29
30
31
32
33
34
|
public class CachingExecutor implements Executor {
  // 第一步
  @Override
  public <E> List<E> query(MappedStatement ms, Object parameterObject, RowBounds rowBounds, ResultHandler 						resultHandler) throws SQLException {
    BoundSql boundSql = ms.getBoundSql(parameterObject);
    //query时传入一个cachekey参数
    CacheKey key = createCacheKey(ms, parameterObject, rowBounds, boundSql);
    return query(ms, parameterObject, rowBounds, resultHandler, key, boundSql);
  }


  // 第二部
    @Override
  public <E> List<E> query(MappedStatement ms, Object parameterObject, RowBounds rowBounds, ResultHandler      resultHandler, CacheKey key, BoundSql boundSql)
      throws SQLException {
    Cache cache = ms.getCache();
    //默认情况下是没有开启缓存的(二级缓存).要开启二级缓存,你需要在你的 SQL 映射文件中添加一行: <cache/>
    //简单的说,就是先查CacheKey,查不到再委托给实际的执行器去查
    if (cache != null) {
      flushCacheIfRequired(ms);
      if (ms.isUseCache() && resultHandler == null) {
        ensureNoOutParams(ms, parameterObject, boundSql);
        @SuppressWarnings("unchecked")
        List<E> list = (List<E>) tcm.getObject(cache, key);
        if (list == null) {
          list = delegate.<E> query(ms, parameterObject, rowBounds, resultHandler, key, boundSql);
          tcm.putObject(cache, key, list); // issue #578 and #116
        }
        return list;
      }
    }
    return delegate.<E> query(ms, parameterObject, rowBounds, resultHandler, key, boundSql);
  }
}
|
先从二级Cache 中取,没有继续委托执行
 1
 2
 3
 4
 5
 6
 7
 8
 9
10
11
12
13
14
15
16
17
18
19
20
21
22
23
24
25
26
27
28
29
30
31
32
33
34
35
36
37
38
39
40
41
42
43
44
45
46
47
48
49
50
51
52
53
54
|
// 第一步
public abstract class BaseExecutor implements Executor {
  @Override
  public <E> List<E> query(MappedStatement ms, Object parameter, RowBounds rowBounds, ResultHandler resultHandler, CacheKey key, BoundSql boundSql) throws SQLException {
    ErrorContext.instance().resource(ms.getResource()).activity("executing a query").object(ms.getId());
    //如果已经关闭,报错
    if (closed) {
      throw new ExecutorException("Executor was closed.");
    }
    //先清局部缓存,再查询.但仅查询堆栈为0,才清。为了处理递归调用
    if (queryStack == 0 && ms.isFlushCacheRequired()) {
      clearLocalCache();
    }
    List<E> list;
    try {
      //加一,这样递归调用到上面的时候就不会再清局部缓存了
      queryStack++;
      //先根据cachekey从localCache去查
      list = resultHandler == null ? (List<E>) localCache.getObject(key) : null;
      if (list != null) {
        //若查到localCache缓存,处理localOutputParameterCache
        handleLocallyCachedOutputParameters(ms, key, parameter, boundSql);
      } else {
        //从数据库查
        list = queryFromDatabase(ms, parameter, rowBounds, resultHandler, key, boundSql);
      }
    } finally {
      //清空堆栈
      queryStack--;
    }
    if (queryStack == 0) {
      //延迟加载队列中所有元素
      for (DeferredLoad deferredLoad : deferredLoads) {
        deferredLoad.load();
      }
      // issue #601
      //清空延迟加载队列
      deferredLoads.clear();
      if (configuration.getLocalCacheScope() == LocalCacheScope.STATEMENT) {
        // issue #482
    	//如果是STATEMENT,清本地缓存
        clearLocalCache();
      }
    }
    return list;
  }

 // 第二步
 private <E> List<E> queryFromDatabase(MappedStatement ms, Object parameter, RowBounds rowBounds, 	 ResultHandler resultHandler, CacheKey key, BoundSql boundSql) throws SQLException {
    List<E>  list = doQuery(ms, parameter, rowBounds, resultHandler, boundSql);
    return list;
  }

}
|
 1
 2
 3
 4
 5
 6
 7
 8
 9
10
11
12
13
14
15
16
17
18
19
20
21
22
23
24
25
26
27
28
29
30
31
32
|
public class SimpleExecutor extends BaseExecutor {
  // 第三步
  @Override
  public <E> List<E> doQuery(MappedStatement ms, Object parameter, RowBounds rowBounds, ResultHandler resultHandler, BoundSql boundSql) throws SQLException {
    Statement stmt = null;
    try {
      // 这个Configuration 和 BaseExecutor的Configuration是同一个对象
      Configuration configuration = ms.getConfiguration();
      //新建一个StatementHandler
      //这里看到ResultHandler传入了
      StatementHandler handler = configuration.newStatementHandler(wrapper, ms, parameter, rowBounds, resultHandler, boundSql);
      //准备语句
      stmt = prepareStatement(handler, ms.getStatementLog());
      //StatementHandler.query
      return handler.<E>query(stmt, resultHandler);
    } finally {
      closeStatement(stmt);
    }
  }

  // 连接数据库
  private Statement prepareStatement(StatementHandler handler, Log statementLog) throws SQLException {
    Statement stmt;
    // 获得连接
    Connection connection = getConnection(statementLog);
    // 调用StatementHandler.prepare
    stmt = handler.prepare(connection);
    // 调用StatementHandler.parameterize
    handler.parameterize(stmt);
    return stmt;
  }
}
|
先执行 BaseExecutor 的 query 从缓存查询,缓存中查不到执行 queryFromDatabase方法,再调用 SimpleExecutor 的 doQuery。
在这里实例化了 StatementHandler 对象,获取数据库连接,最后由 StatementHandler 执行具体的SQL语句。
 1
 2
 3
 4
 5
 6
 7
 8
 9
10
|
public class SimpleStatementHandler extends BaseStatementHandler {
@Override
  public <E> List<E> query(Statement statement, ResultHandler resultHandler) throws SQLException {
    String sql = boundSql.getSql();
    // 执行SQL语句
    statement.execute(sql);
    //先执行Statement.execute,然后交给ResultSetHandler.handleResultSets
    return resultSetHandler.<E>handleResultSets(statement);
  }
}
|
DefaultResultSetHandler 处理执行结果并返回。
 1
 2
 3
 4
 5
 6
 7
 8
 9
10
11
12
13
14
15
16
17
18
19
20
21
22
23
24
25
26
27
28
29
30
31
32
33
34
35
36
37
38
39
40
41
|
public class DefaultResultSetHandler implements ResultSetHandler {
  @Override
  public List<Object> handleResultSets(Statement stmt) throws SQLException {
    ErrorContext.instance().activity("handling results").object(mappedStatement.getId());

    final List<Object> multipleResults = new ArrayList<Object>();

    int resultSetCount = 0;
    ResultSetWrapper rsw = getFirstResultSet(stmt);

    List<ResultMap> resultMaps = mappedStatement.getResultMaps();
    //一般resultMaps里只有一个元素
    int resultMapCount = resultMaps.size();
    validateResultMapsCount(rsw, resultMapCount);
    while (rsw != null && resultMapCount > resultSetCount) {
      ResultMap resultMap = resultMaps.get(resultSetCount);
      handleResultSet(rsw, resultMap, multipleResults, null);
      rsw = getNextResultSet(stmt);
      cleanUpAfterHandlingResultSet();
      resultSetCount++;
    }

    String[] resultSets = mappedStatement.getResulSets();
    if (resultSets != null) {
      while (rsw != null && resultSetCount < resultSets.length) {
        ResultMapping parentMapping = nextResultMaps.get(resultSets[resultSetCount]);
        if (parentMapping != null) {
          String nestedResultMapId = parentMapping.getNestedResultMapId();
          ResultMap resultMap = configuration.getResultMap(nestedResultMapId);
          handleResultSet(rsw, resultMap, null, parentMapping);
        }
        rsw = getNextResultSet(stmt);
        cleanUpAfterHandlingResultSet();
        resultSetCount++;
      }
    }

    return collapseSingleResultList(multipleResults);
  }

}
|
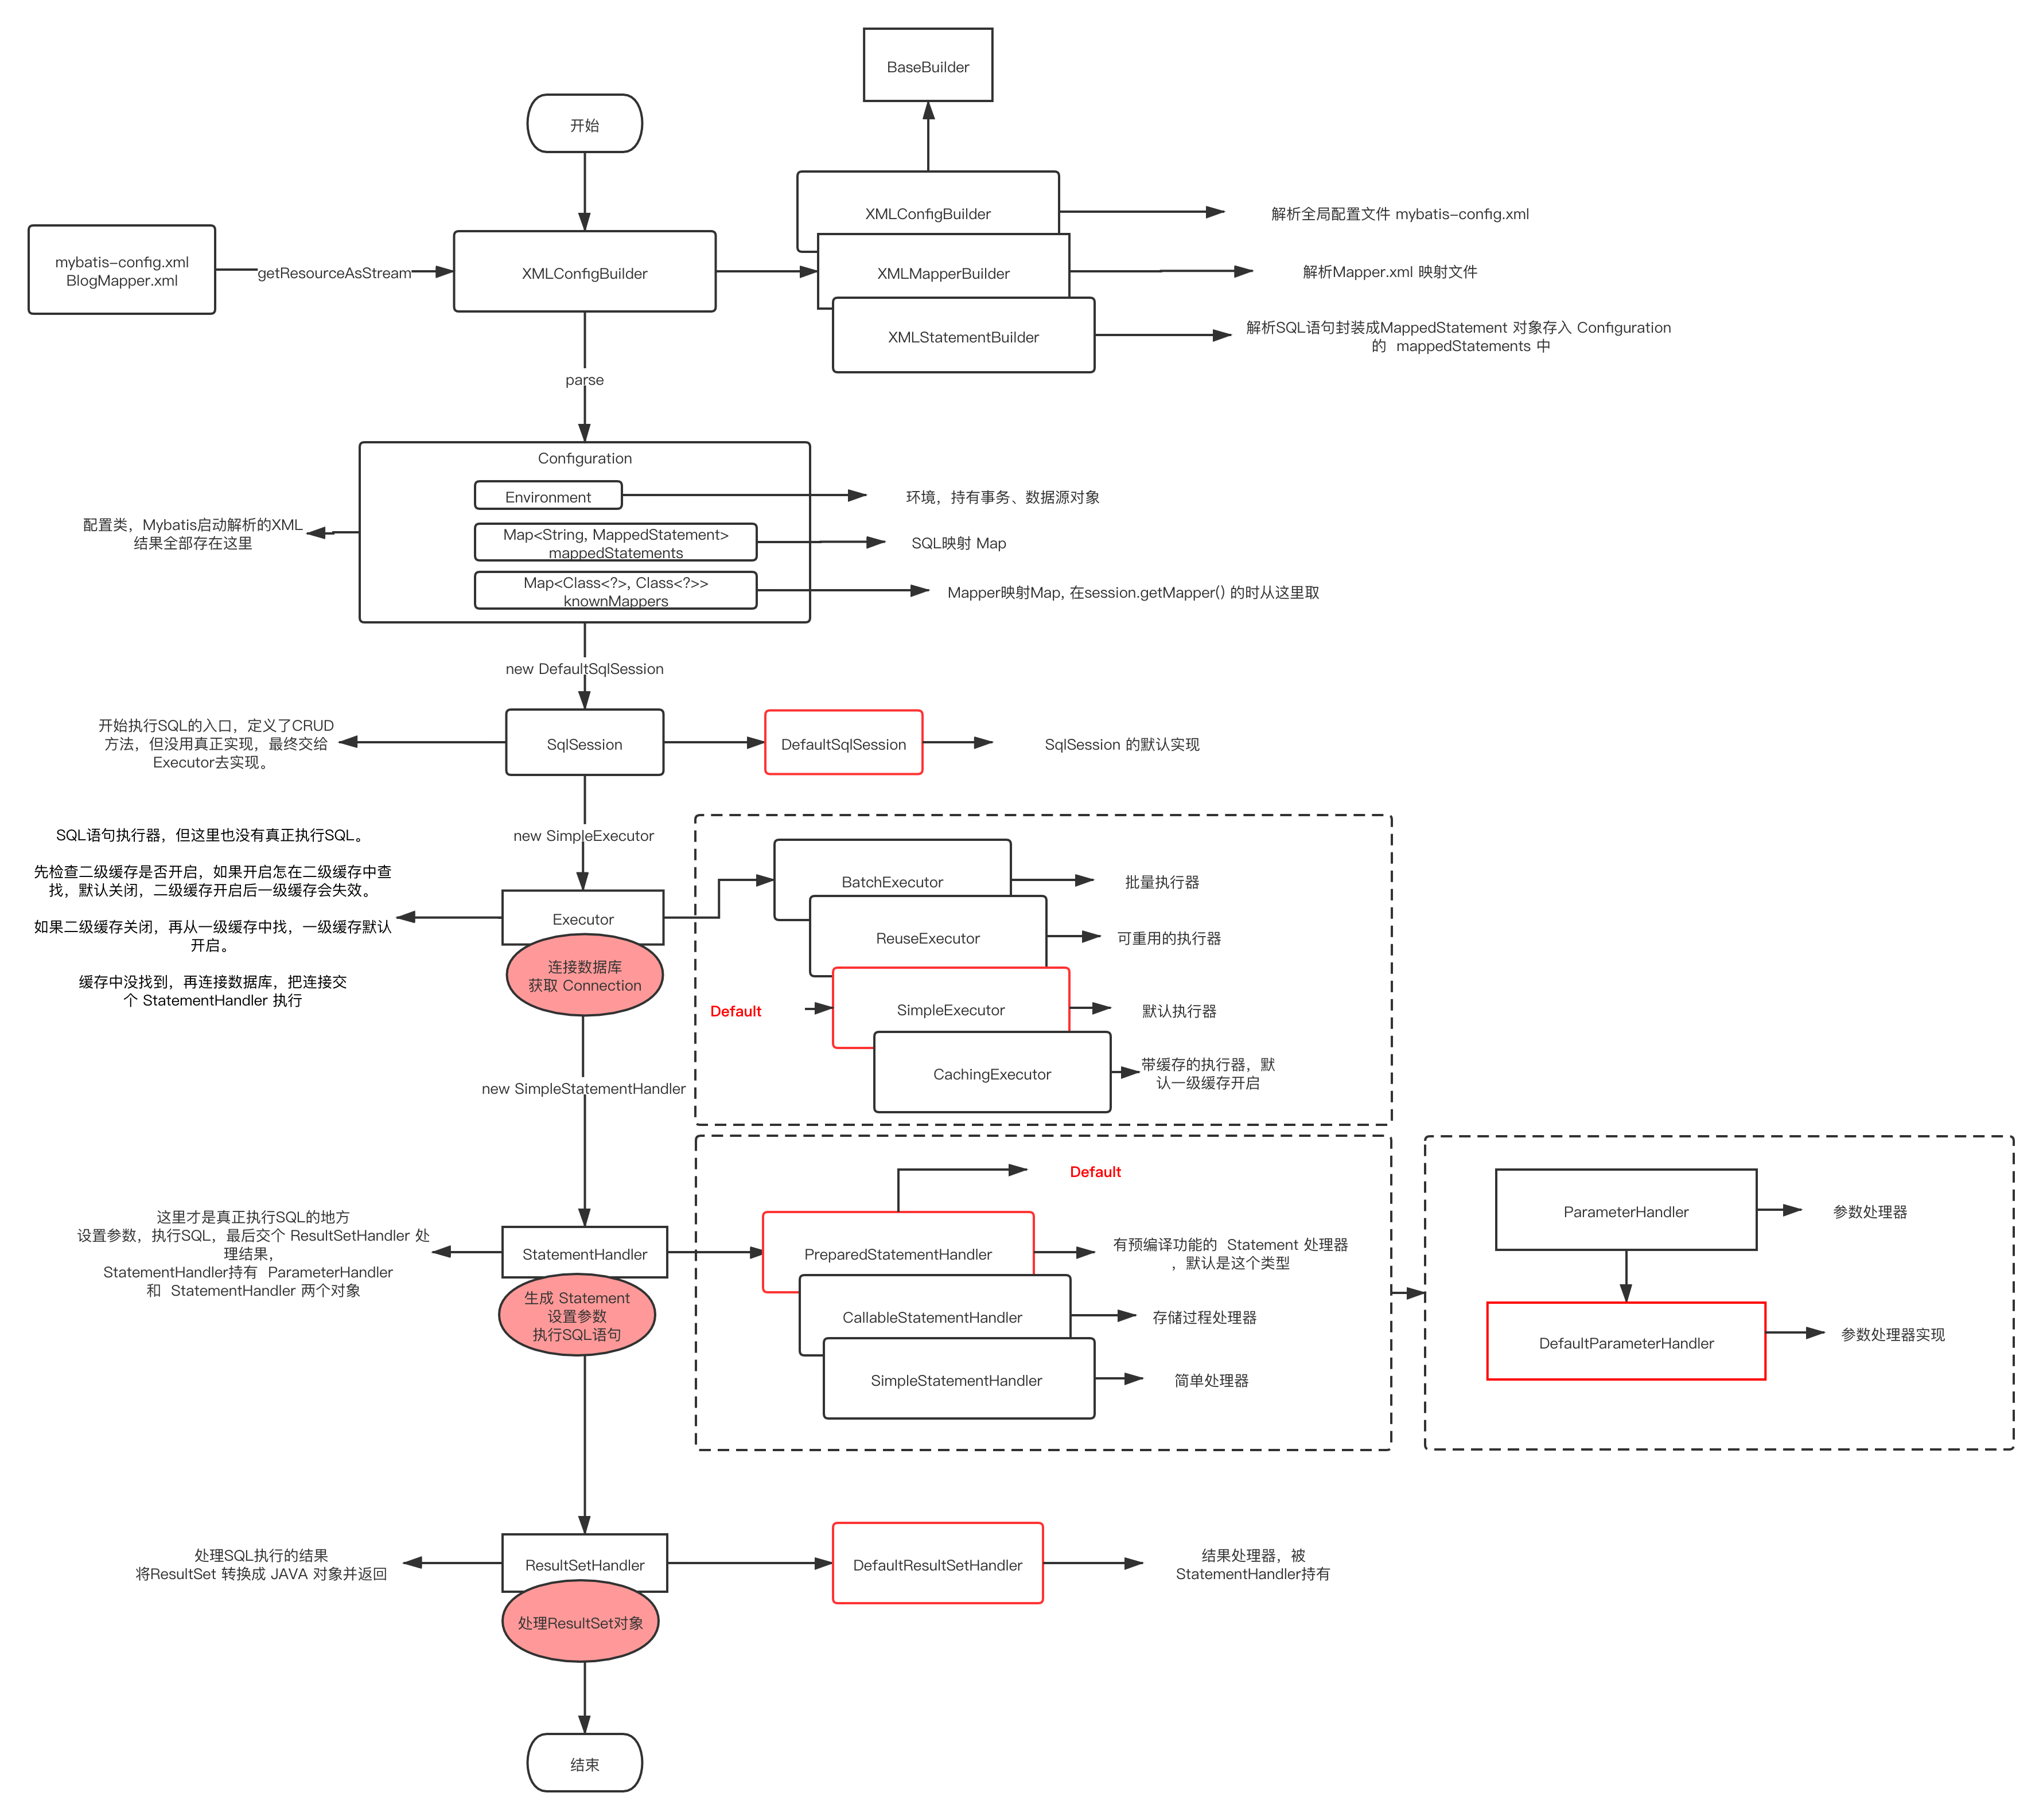
MyBatis 源码完整流程图
 telzhou618 收录于 java