RocketMQ 集群架构图
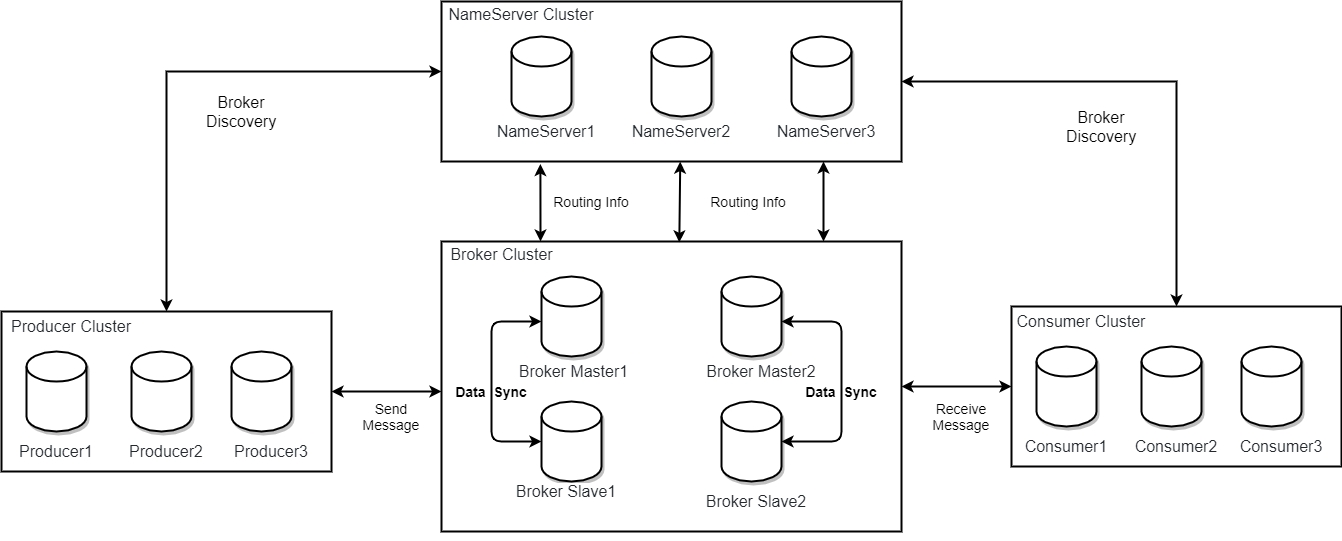
RocketMQ 四大核心集群
- NameServer 集群:作为注册中心,维护着所有的broker和topic的映射关系,以及路由功能,多台部署,之间不互相通信。
- Broker集群 :负责消息存储,消息转发。
- Producer集群 :生产消息,一般是自己的Application集群。
- Consumer集群:消费消息,一般是自己的Application集群。
RocketMQ 其他核心组件
- Consumer Group:消费者组,集群模式相同Group的每个Consumer平均分摊消息,广播模式相同Group的每个Consumer都接收全量消息。
- Topic:一类消息的集合,一个消息只能属于一个Topic。
- Message:消息的载体。
- Message Queue:消息分区,每个Topic下可以有多个分区。
- Tag:给消息设置一个标签,消费者可以过滤出想要的消息。
RocketMQ 消息发送方式
单项发送
只负责发出去,不管是否成功,没有返回值,一般用在可靠性不高的场景,如记录日志。
1
|
producer.sendOneway(msg);
|
同步发送
需要同步等待消费发送的结果,有返回值,用在可靠性要求高,性能不高的场景。
1
2
3
4
|
// Send message to one of brokers
SendResult sendResult = producer.send(msg);
// Check whether the message has been delivered by the callback of sendResult
System.out.printf("%s%n", sendResult);
|
异步发送
无需等待返回值,需要实现回调方法,消息发送完成会自动执行回调方法,用在可靠性和性能要求较高的场景。
 1
 2
 3
 4
 5
 6
 7
 8
 9
10
11
12
|
producer.send(msg, new SendCallback() {
  @Override
  public void onSuccess(SendResult sendResult) {
    System.out.printf("%-10d OK %s %n", index,
                      sendResult.getMsgId());
  }
  @Override
  public void onException(Throwable e) {
    System.out.printf("%-10d Exception %s %n", index, e);
    e.printStackTrace();
  }
});
|
RocketMQ 消息类型
顺序消息
事务消息
是指应用本地事务和消息可以定义在一个全局事务中,要么同时成功,要么同时失败,可应用在消息和数据库数据严格一致的场景。
样例:https://github.com/apache/rocketmq/blob/master/docs/cn/RocketMQ_Example.md#61-发送事务消息样例
延迟消息
消息发送给brocker后不会立即消息,一段时间后投递给真正的 Topic, 比如:电商场景一个订单创建1小时候没付款,自动释放库存。
1
2
3
4
5
|
Message message = new Message("TestTopic", ("Hello scheduled message " + i).getBytes());
// 设置延时等级3,这个消息将在10s之后发送(现在只支持固定的几个时间,详看delayTimeLevel)
message.setDelayTimeLevel(3);
// 发送消息
producer.send(message);
|
1
|
private String messageDelayLevel = "1s 5s 10s 30s 1m 2m 3m 4m 5m 6m 7m 8m 9m 10m 20m 30m 1h 2h";
|
可靠消息
-
如何保证生产者发消息成功?同步发消息、同步方式同步从节点、同步方式刷盘。
-
如何保证消费者消费成功?不要异步消费,消费成功返回ACK,如果消费失败,MQ会重试。
-
MQ 集群宕机怎么办?把消息咱存在Redis,等MQ恢复后再异步再发给MQ。
消息过滤
发消息时设置 TAG,消费端可以用TAG过滤只选择自己想要的消息,不想要的不会发给消费者,可以减少网络传输,但增加复杂性。
1
2
|
DefaultMQPushConsumer consumer = new DefaultMQPushConsumer("CID_EXAMPLE");
consumer.subscribe("TOPIC", "TAGA || TAGB || TAGC");
|
回溯消息
消费过的消息不会立即删除,如果MQ宕机重启后,消费者可以选择重新消费某一时间前的历史消息重新消费,称为回溯消息。
流量控制
如果 broker 的处理能达到瓶颈,可设置拒绝消息发送,消费者端可通过降低拉取消息的评率流控。
死信队列
对于消费失败的消息,重试次数达到最大值后会迁移到一个特殊的队列,这类消息称为死信,可以在MQ控制台手动重发来进行消费。
RocketMQ 核心原理
事务消息原理
Brocker 选主原理
-
Broker 启动后会主动向NameServer注册自己的信息,之后每隔30秒上报一次Topic路由信息。
-
为保证Broker高可用,borker 引入了 dledger 集群部署方式,当主节点宕机后,dledger集群会自动产生一个新的主节点提供服务,dledger 实现了 Raft 协议,支持选主等功能,更多参考:DLedger - 基于 Raft 算法的 Commitlog Library 。
-
相比kafa引入 zk 实现动态选主的方式dledger 更加轻量,可以直接以 jar 使用。
Brocker 存储消息原理
RocketMQ 实现消息持久化存储,主要有如下三种文件组成。
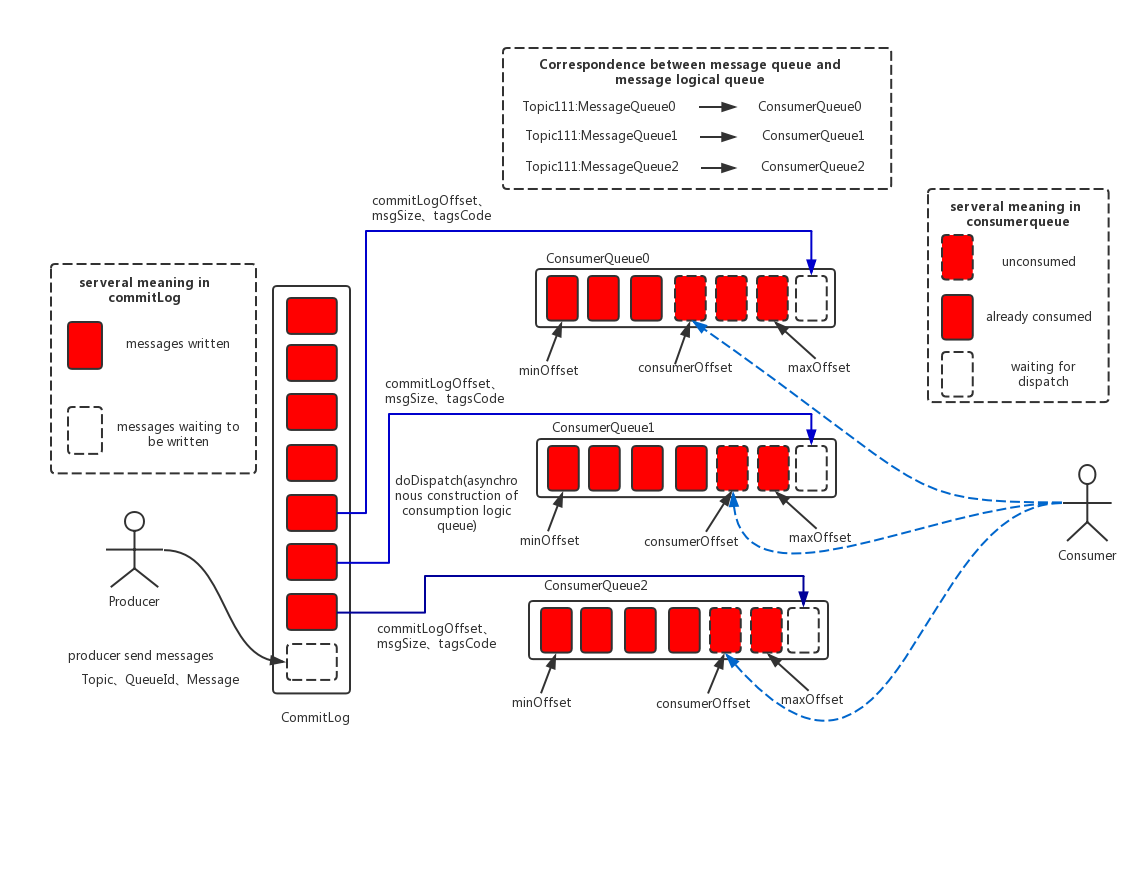
- CommitLog:具体存储消息的载体,提前申请连续存储空间,顺序写入速度快。
- ConsumeQueue:消费队列,记录Topic和消息存储关系,已经记录消息的当前消费位置(偏移量)。
- IndexFile:索引文件,可通过KEY或时间区间快速查询消息。
RocketMQ 源码解析
NameServer 源码
1
2
3
4
5
6
7
8
9
10
11
12
13
14
15
16
17
18
|
public static void main(String[] args) {
main0(args);
}
public static NamesrvController main0(String[] args) {
try {
// 实例化 NamesrvController 对象
NamesrvController controller = createNamesrvController(args);
// 执行启动逻辑
start(controller);
return controller;
} catch (Throwable e) {
e.printStackTrace();
System.exit(-1);
}
return null;
}
|
关键代码就以上两行,createNamesrvController 方法实例化NamesrvController对象,然后执行start方法实现启动逻辑
- createNamesrvController() 方法解析
 1
 2
 3
 4
 5
 6
 7
 8
 9
10
11
12
13
14
15
16
17
18
19
20
21
22
23
24
25
26
27
28
29
30
31
32
33
34
35
36
37
38
39
40
41
42
43
44
45
46
47
48
49
50
|
public static NamesrvController createNamesrvController(String[] args) throws IOException, JoranException {
System.setProperty(RemotingCommand.REMOTING_VERSION_KEY, Integer.toString(MQVersion.CURRENT_VERSION));
//PackageConflictDetect.detectFastjson();
Options options = ServerUtil.buildCommandlineOptions(new Options());
commandLine = ServerUtil.parseCmdLine("mqnamesrv", args, buildCommandlineOptions(options), new PosixParser());
if (null == commandLine) {
System.exit(-1);
return null;
}
// 实例化 NameServer 配置类
final NamesrvConfig namesrvConfig = new NamesrvConfig();
// 实例化 Netty 配置类
final NettyServerConfig nettyServerConfig = new NettyServerConfig();
nettyServerConfig.setListenPort(9876);
if (commandLine.hasOption('c')) {
// 解析参数C,C参数用来置顶配置的文件, 具体逻辑代码忽略。
}
if (commandLine.hasOption('p')) {
// 解析参数p,p参数用来单独设置配置属性和属性值,具体逻辑代码忽略。
}
MixAll.properties2Object(ServerUtil.commandLine2Properties(commandLine), namesrvConfig);
if (null == namesrvConfig.getRocketmqHome()) {
System.out.printf("Please set the %s variable in your environment to match the location of the RocketMQ installation%n", MixAll.ROCKETMQ_HOME_ENV);
System.exit(-2);
}
// 加载日志配置文件
LoggerContext lc = (LoggerContext) LoggerFactory.getILoggerFactory();
JoranConfigurator configurator = new JoranConfigurator();
configurator.setContext(lc);
lc.reset();
configurator.doConfigure(namesrvConfig.getRocketmqHome() + "/conf/logback_namesrv.xml");
log = InternalLoggerFactory.getLogger(LoggerName.NAMESRV_LOGGER_NAME);
MixAll.printObjectProperties(log, namesrvConfig);
MixAll.printObjectProperties(log, nettyServerConfig);
// 使用前面两个 configure 对象实例化 NamesrvController对象。
final NamesrvController controller = new NamesrvController(namesrvConfig, nettyServerConfig);
// remember all configs to prevent discard
controller.getConfiguration().registerConfig(properties);
return controller;
}
|
这里主要做了两件事,1.把所有的配置信息解析成 NamesrvConfig 和 NettyServerConfig 对象。2.传入使用配置对象实例化NamesrvController对象。
- 下面看下实例化 NamesrvController 的构造方法做可哪些事
1
2
3
4
5
6
7
8
9
10
11
12
|
public NamesrvController(NamesrvConfig namesrvConfig, NettyServerConfig nettyServerConfig) {
this.namesrvConfig = namesrvConfig;
this.nettyServerConfig = nettyServerConfig;
this.kvConfigManager = new KVConfigManager(this);
this.routeInfoManager = new RouteInfoManager();
this.brokerHousekeepingService = new BrokerHousekeepingService(this);
this.configuration = new Configuration(
log,
this.namesrvConfig, this.nettyServerConfig
);
this.configuration.setStorePathFromConfig(this.namesrvConfig, "configStorePath");
}
|
就是一些对象的赋值操作,测试 NamesrvController 对象创建完毕。
1
2
3
4
5
6
7
8
9
10
11
12
13
14
15
16
17
18
19
20
21
22
23
24
25
|
public static NamesrvController start(final NamesrvController controller) throws Exception {
if (null == controller) {
throw new IllegalArgumentException("NamesrvController is null");
}
// 执行 NamesrvController 的初始化方法
boolean initResult = controller.initialize();
if (!initResult) {
controller.shutdown();
System.exit(-3);
}
// 注册钩子方法,服务关闭是执行,做一些清理工作。
Runtime.getRuntime().addShutdownHook(new ShutdownHookThread(log, new Callable<Void>() {
@Override
public Void call() throws Exception {
controller.shutdown();
return null;
}
}));
// 执行启动
controller.start();
return controller;
}
|
这里重要有两个方法,controller.initialize() 和 controller.start(),下面具体看下执行逻辑。
 1
 2
 3
 4
 5
 6
 7
 8
 9
10
11
12
13
14
15
16
17
18
19
20
21
22
23
24
25
26
27
28
29
30
31
32
33
34
35
36
37
38
39
40
|
public boolean initialize() {
// 加载 kv存储模块,读取配置中的 kvConfig.json文件内容。
this.kvConfigManager.load();
// 实例化 Netty服务端对象,用于处理客户端和 broker的请求。
this.remotingServer = new NettyRemotingServer(this.nettyServerConfig, this.brokerHousekeepingService);
this.remotingExecutor =
Executors.newFixedThreadPool(nettyServerConfig.getServerWorkerThreads(), new ThreadFactoryImpl("RemotingExecutorThread_"));
this.registerProcessor();
// 定时扫描 broker,移除不活跃的broker
this.scheduledExecutorService.scheduleAtFixedRate(new Runnable() {
@Override
public void run() {
NamesrvController.this.routeInfoManager.scanNotActiveBroker();
}
}, 5, 10, TimeUnit.SECONDS);
// 定时器,每隔10min打印一次KV配置
this.scheduledExecutorService.scheduleAtFixedRate(new Runnable() {
@Override
public void run() {
NamesrvController.this.kvConfigManager.printAllPeriodically();
}
}, 1, 10, TimeUnit.MINUTES);
// 如果开启SSL支持,执行以下逻辑,监听器证书变化时会实时更新,做到热加载
if (TlsSystemConfig.tlsMode != TlsMode.DISABLED) {
// Register a listener to reload SslContext
try {
// ...
} catch (Exception e) {
log.warn("FileWatchService created error, can't load the certificate dynamically");
}
}
return true;
}
|
1
2
3
4
5
6
7
8
9
|
public void start() throws Exception {
// 启动 netty 服务
this.remotingServer.start();
if (this.fileWatchService != null) {
// 检测SSL证书文件是否变化,如果有变,及时加载最新的秘钥信息。
this.fileWatchService.start();
}
}
|
remotingServer.start() 会真正启动一个NettyServer程序用于处理来自其他服务的请求,熟悉Netty的话会非常容易看明白。
以上是 NameServer 启动的源码解析,可以总结为两步。
- 解析配置文件。
- 启动NettyServer服务。
Broker 启动源码
从启动类 BrokerStartup 开始
1
2
3
|
public static void main(String[] args) {
start(createBrokerController(args));
}
|
有两个核心方法,createBrokerController 方法创建BrokerController对象,然后传个 start 方法执行启动工作。
createBrokerController 方法
 1
 2
 3
 4
 5
 6
 7
 8
 9
10
11
12
13
14
15
16
17
18
19
20
21
22
23
24
25
26
27
28
29
30
31
32
33
34
35
36
37
38
39
40
41
42
43
44
45
46
47
48
49
50
51
52
53
54
55
56
57
58
59
60
61
62
63
64
65
66
67
68
69
70
71
72
73
74
75
76
77
78
79
80
81
82
83
84
85
86
87
88
89
90
91
92
93
94
95
96
97
98
99
100
101
102
103
104
105
106
107
108
109
110
111
112
113
114
115
116
117
118
119
120
121
122
123
124
125
126
127
128
129
130
131
132
133
134
135
|
public static BrokerController createBrokerController(String[] args) {
try {
//PackageConflictDetect.detectFastjson();
Options options = ServerUtil.buildCommandlineOptions(new Options());
commandLine = ServerUtil.parseCmdLine("mqbroker", args, buildCommandlineOptions(options),
new PosixParser());
if (null == commandLine) {
System.exit(-1);
}
// 实例化 broker 的配置对象
final BrokerConfig brokerConfig = new BrokerConfig();
// 实例化 Netty 配置对象
final NettyServerConfig nettyServerConfig = new NettyServerConfig();
final NettyClientConfig nettyClientConfig = new NettyClientConfig();
// 设置 Netty 的端口
nettyServerConfig.setListenPort(10911);
// 实例化消息存储的配置对象
final MessageStoreConfig messageStoreConfig = new MessageStoreConfig();
if (BrokerRole.SLAVE == messageStoreConfig.getBrokerRole()) {
int ratio = messageStoreConfig.getAccessMessageInMemoryMaxRatio() - 10;
messageStoreConfig.setAccessMessageInMemoryMaxRatio(ratio);
}
if (commandLine.hasOption('c')) {
// 解析参数 c
}
MixAll.properties2Object(ServerUtil.commandLine2Properties(commandLine), brokerConfig);
if (null == brokerConfig.getRocketmqHome()) {
System.out.printf("Please set the %s variable in your environment to match the location of the RocketMQ installation", MixAll.ROCKETMQ_HOME_ENV);
System.exit(-2);
}
String namesrvAddr = brokerConfig.getNamesrvAddr();
if (null != namesrvAddr) {
try {
String[] addrArray = namesrvAddr.split(";");
for (String addr : addrArray) {
RemotingUtil.string2SocketAddress(addr);
}
} catch (Exception e) {
System.out.printf(
"The Name Server Address[%s] illegal, please set it as follows, \"127.0.0.1:9876;192.168.0.1:9876\"%n",
namesrvAddr);
System.exit(-3);
}
}
switch (messageStoreConfig.getBrokerRole()) {
case ASYNC_MASTER:
case SYNC_MASTER:
brokerConfig.setBrokerId(MixAll.MASTER_ID);
break;
case SLAVE:
if (brokerConfig.getBrokerId() <= 0) {
System.out.printf("Slave's brokerId must be > 0");
System.exit(-3);
}
break;
default:
break;
}
if (messageStoreConfig.isEnableDLegerCommitLog()) {
brokerConfig.setBrokerId(-1);
}
messageStoreConfig.setHaListenPort(nettyServerConfig.getListenPort() + 1);
LoggerContext lc = (LoggerContext) LoggerFactory.getILoggerFactory();
JoranConfigurator configurator = new JoranConfigurator();
configurator.setContext(lc);
lc.reset();
configurator.doConfigure(brokerConfig.getRocketmqHome() + "/conf/logback_broker.xml");
if (commandLine.hasOption('p')) {
// 解析参数 p
} else if (commandLine.hasOption('m')) {
// 解析参数 m
}
log = InternalLoggerFactory.getLogger(LoggerName.BROKER_LOGGER_NAME);
MixAll.printObjectProperties(log, brokerConfig);
MixAll.printObjectProperties(log, nettyServerConfig);
MixAll.printObjectProperties(log, nettyClientConfig);
MixAll.printObjectProperties(log, messageStoreConfig);
// 实例化 BrokerController 对象
final BrokerController controller = new BrokerController(
brokerConfig,
nettyServerConfig,
nettyClientConfig,
messageStoreConfig);
// remember all configs to prevent discard
controller.getConfiguration().registerConfig(properties);
boolean initResult = controller.initialize();
if (!initResult) {
controller.shutdown();
System.exit(-3);
}
// 注册一个 JVM 关闭时的钩子方法,用于做一些清理工作
Runtime.getRuntime().addShutdownHook(new Thread(new Runnable() {
private volatile boolean hasShutdown = false;
private AtomicInteger shutdownTimes = new AtomicInteger(0);
@Override
public void run() {
synchronized (this) {
log.info("Shutdown hook was invoked, {}", this.shutdownTimes.incrementAndGet());
if (!this.hasShutdown) {
this.hasShutdown = true;
long beginTime = System.currentTimeMillis();
controller.shutdown();
long consumingTimeTotal = System.currentTimeMillis() - beginTime;
log.info("Shutdown hook over, consuming total time(ms): {}", consumingTimeTotal);
}
}
}
}, "ShutdownHook"));
return controller;
} catch (Throwable e) {
e.printStackTrace();
System.exit(-1);
}
return null;
}
|
 1
 2
 3
 4
 5
 6
 7
 8
 9
10
11
12
13
14
15
16
17
18
|
public BrokerController(
final BrokerConfig brokerConfig,
final NettyServerConfig nettyServerConfig,
final NettyClientConfig nettyClientConfig,
final MessageStoreConfig messageStoreConfig
) {
this.brokerConfig = brokerConfig;
this.nettyServerConfig = nettyServerConfig;
this.nettyClientConfig = nettyClientConfig;
this.messageStoreConfig = messageStoreConfig;
this.consumerOffsetManager = new ConsumerOffsetManager(this);
this.topicConfigManager = new TopicConfigManager(this);
this.pullMessageProcessor = new PullMessageProcessor(this);
this.pullRequestHoldService = new PullRequestHoldService(this);
this.messageArrivingListener = new NotifyMessageArrivingListener(this.pullRequestHoldService);
this.consumerIdsChangeListener = new DefaultConsumerIdsChangeListener(this);
//...
}
|
以上为实例化 BrokerController 的过程.
start 方法
1
2
3
4
5
6
7
8
9
10
|
public static BrokerController start(BrokerController controller) {
try {
controller.start();
return controller;
} catch (Throwable e) {
e.printStackTrace();
System.exit(-1);
}
return null;
}
|
 1
 2
 3
 4
 5
 6
 7
 8
 9
10
11
12
13
14
15
16
17
18
19
20
21
22
23
24
25
26
27
28
29
30
31
32
33
34
35
36
37
38
39
40
41
42
43
44
45
46
47
48
49
50
51
52
53
54
55
56
57
58
59
60
|
public void start() throws Exception {
// 启动消息存储服务
if (this.messageStore != null) {
this.messageStore.start();
}
// 启动 Netty 服务,用于接收外部的请求
if (this.remotingServer != null) {
this.remotingServer.start();
}
if (this.fastRemotingServer != null) {
this.fastRemotingServer.start();
}
// 启动配置文件监控服务,用于配置热更新。
if (this.fileWatchService != null) {
this.fileWatchService.start();
}
if (this.brokerOuterAPI != null) {
this.brokerOuterAPI.start();
}
if (this.pullRequestHoldService != null) {
this.pullRequestHoldService.start();
}
if (this.clientHousekeepingService != null) {
this.clientHousekeepingService.start();
}
if (this.filterServerManager != null) {
this.filterServerManager.start();
}
if (!messageStoreConfig.isEnableDLegerCommitLog()) {
startProcessorByHa(messageStoreConfig.getBrokerRole());
handleSlaveSynchronize(messageStoreConfig.getBrokerRole());
this.registerBrokerAll(true, false, true);
}
this.scheduledExecutorService.scheduleAtFixedRate(new Runnable() {
@Override
public void run() {
try {
BrokerController.this.registerBrokerAll(true, false, brokerConfig.isForceRegister());
} catch (Throwable e) {
log.error("registerBrokerAll Exception", e);
}
}
}, 1000 * 10, Math.max(10000, Math.min(brokerConfig.getRegisterNameServerPeriod(), 60000)), TimeUnit.MILLISECONDS);
if (this.brokerStatsManager != null) {
this.brokerStatsManager.start();
}
if (this.brokerFastFailure != null) {
this.brokerFastFailure.start();
}
}
|
以上为启动 Broker 的过程。
Producer 发消息给Broker 源码
Producer 发消息主要代码在 client 包中实现,发消息的方式大致有三种,单向、同步、异步。发消息的默认入口都在 DefaultMQProducerImpl 这个类中,下面看下最简单的单向发消息接口。
单向发消息
DefaultMQProducerImpl 类中的 sendOneway 是单向发消息的入口
1
2
3
4
5
6
7
|
public void sendOneway(Message msg) throws MQClientException, RemotingException, InterruptedException {
try {
this.sendDefaultImpl(msg, CommunicationMode.ONEWAY, null, this.defaultMQProducer.getSendMsgTimeout());
} catch (MQBrokerException e) {
throw new MQClientException("unknown exception", e);
}
}
|
接着调用私有方法 this.sendDefaualtImpl()
 1
 2
 3
 4
 5
 6
 7
 8
 9
10
11
12
13
14
15
16
17
18
19
20
21
22
23
24
25
26
27
28
29
30
31
32
33
34
35
36
37
38
39
40
41
42
43
44
45
46
47
48
49
50
51
52
53
54
55
56
57
58
59
60
61
62
63
64
65
66
67
68
69
70
71
|
private SendResult sendDefaultImpl(
Message msg,
final CommunicationMode communicationMode,
final SendCallback sendCallback,
final long timeout
) throws MQClientException, RemotingException, MQBrokerException, InterruptedException {
// ... 忽略一些不必要的代码
// 获取Topic信息
TopicPublishInfo topicPublishInfo = this.tryToFindTopicPublishInfo(msg.getTopic());
// 判断Topic是否正常
if (topicPublishInfo != null && topicPublishInfo.ok()) {
boolean callTimeout = false;
MessageQueue mq = null;
Exception exception = null;
SendResult sendResult = null;
int timesTotal = communicationMode == CommunicationMode.SYNC ? 1 + this.defaultMQProducer.getRetryTimesWhenSendFailed() : 1;
int times = 0;
String[] brokersSent = new String[timesTotal];
for (; times < timesTotal; times++) {
String lastBrokerName = null == mq ? null : mq.getBrokerName();
// 选择一个MessageQueue
MessageQueue mqSelected = this.selectOneMessageQueue(topicPublishInfo, lastBrokerName);
if (mqSelected != null) {
mq = mqSelected;
brokersSent[times] = mq.getBrokerName();
try {
beginTimestampPrev = System.currentTimeMillis();
if (times > 0) {
//Reset topic with namespace during resend.
msg.setTopic(this.defaultMQProducer.withNamespace(msg.getTopic()));
}
long costTime = beginTimestampPrev - beginTimestampFirst;
if (timeout < costTime) {
callTimeout = true;
break;
}
// 发送消息
sendResult = this.sendKernelImpl(msg, mq, communicationMode, sendCallback, topicPublishInfo, timeout - costTime);
endTimestamp = System.currentTimeMillis();
this.updateFaultItem(mq.getBrokerName(), endTimestamp - beginTimestampPrev, false);
switch (communicationMode) {
case ASYNC:
// 异步发送消息不关心返回值
return null;
case ONEWAY:
// 单项发送消息不关心返回值
return null;
case SYNC:
// 同步发送消息需要返回值
if (sendResult.getSendStatus() != SendStatus.SEND_OK) {
if (this.defaultMQProducer.isRetryAnotherBrokerWhenNotStoreOK()) {
continue;
}
}
return sendResult;
default:
break;
}
} catch (RemotingException e) {
// 处理异常...
}
} else {
break;
}
}
if (sendResult != null) {
return sendResult;
}
//...
}
|
- 选择要发送的 MessageQucence, 这里有具体的负载均衡算实现。
- 发送消息都调用私有方法 this.sendKernelImpl 实现。
this.sendKernelImpl()方法
1
2
3
4
5
6
7
8
9
10
11
12
13
14
15
16
17
18
19
20
21
22
23
24
25
26
27
28
29
30
31
32
33
34
35
36
37
38
39
40
41
42
43
44
45
46
47
48
49
50
51
52
53
54
55
56
57
58
59
60
61
62
63
64
65
66
67
68
69
70
71
72
73
74
75
76
77
78
79
80
81
82
83
84
85
86
87
88
89
90
91
92
93
94
95
96
97
98
99
100
101
102
|
private SendResult sendKernelImpl(final Message msg,
final MessageQueue mq,
final CommunicationMode communicationMode,
final SendCallback sendCallback,
final TopicPublishInfo topicPublishInfo,
final long timeout) throws MQClientException, RemotingException, MQBrokerException, InterruptedException {
long beginStartTime = System.currentTimeMillis();
// 根据 broker名称查询地址
String brokerAddr = this.mQClientFactory.findBrokerAddressInPublish(mq.getBrokerName());
if (null == brokerAddr) {
tryToFindTopicPublishInfo(mq.getTopic());
brokerAddr = this.mQClientFactory.findBrokerAddressInPublish(mq.getBrokerName());
}
SendMessageContext context = null;
if (brokerAddr != null) {
brokerAddr = MixAll.brokerVIPChannel(this.defaultMQProducer.isSendMessageWithVIPChannel(), brokerAddr);
byte[] prevBody = msg.getBody();
try {
//for MessageBatch,ID has been set in the generating process
// 设置参数,忽略
SendResult sendResult = null;
switch (communicationMode) {
case ASYNC:
// 异步发送消息
Message tmpMessage = msg;
boolean messageCloned = false;
if (msgBodyCompressed) {
//If msg body was compressed, msgbody should be reset using prevBody.
//Clone new message using commpressed message body and recover origin massage.
//Fix bug:https://github.com/apache/rocketmq-externals/issues/66
tmpMessage = MessageAccessor.cloneMessage(msg);
messageCloned = true;
msg.setBody(prevBody);
}
if (topicWithNamespace) {
if (!messageCloned) {
tmpMessage = MessageAccessor.cloneMessage(msg);
messageCloned = true;
}
msg.setTopic(NamespaceUtil.withoutNamespace(msg.getTopic(), this.defaultMQProducer.getNamespace()));
}
long costTimeAsync = System.currentTimeMillis() - beginStartTime;
if (timeout < costTimeAsync) {
throw new RemotingTooMuchRequestException("sendKernelImpl call timeout");
}
// 同步发送实现
sendResult = this.mQClientFactory.getMQClientAPIImpl().sendMessage(
brokerAddr,
mq.getBrokerName(),
tmpMessage,
requestHeader,
timeout - costTimeAsync,
communicationMode,
sendCallback,
topicPublishInfo,
this.mQClientFactory,
this.defaultMQProducer.getRetryTimesWhenSendAsyncFailed(),
context,
this);
break;
// 单项发送消息
case ONEWAY:
// 同步发送消息
case SYNC:
long costTimeSync = System.currentTimeMillis() - beginStartTime;
if (timeout < costTimeSync) {
throw new RemotingTooMuchRequestException("sendKernelImpl call timeout");
}
// 同步发送实现
sendResult = this.mQClientFactory.getMQClientAPIImpl().sendMessage(
brokerAddr,
mq.getBrokerName(),
msg,
requestHeader,
timeout - costTimeSync,
communicationMode,
context,
this);
break;
default:
assert false;
break;
}
if (this.hasSendMessageHook()) {
context.setSendResult(sendResult);
this.executeSendMessageHookAfter(context);
}
return sendResult;
} catch (RemotingException e) {
// ...
} finally {
// ...
}
}
}
|
不管什么方式的消息,最后都调用 this.mQClientFactory.getMQClientAPIImpl().sendMessage()实现。
this.mQClientFactory.getMQClientAPIImpl().sendMessage()
1
2
3
4
5
6
7
8
9
10
11
12
13
14
15
16
17
18
19
20
21
22
23
24
25
26
27
28
29
30
31
32
33
34
35
36
37
38
39
40
41
42
43
44
45
46
47
48
49
50
51
52
53
54
55
56
57
58
59
60
61
62
63
64
65
|
public SendResult sendMessage(
final String addr,
final String brokerName,
final Message msg,
final SendMessageRequestHeader requestHeader,
final long timeoutMillis,
final CommunicationMode communicationMode,
final SendCallback sendCallback,
final TopicPublishInfo topicPublishInfo,
final MQClientInstance instance,
final int retryTimesWhenSendFailed,
final SendMessageContext context,
final DefaultMQProducerImpl producer
) throws RemotingException, MQBrokerException, InterruptedException {
long beginStartTime = System.currentTimeMillis();
// 生成 RemotingCommand 对象
RemotingCommand request = null;
String msgType = msg.getProperty(MessageConst.PROPERTY_MESSAGE_TYPE);
boolean isReply = msgType != null && msgType.equals(MixAll.REPLY_MESSAGE_FLAG);
if (isReply) {
if (sendSmartMsg) {
SendMessageRequestHeaderV2 requestHeaderV2 = SendMessageRequestHeaderV2.createSendMessageRequestHeaderV2(requestHeader);
request = RemotingCommand.createRequestCommand(RequestCode.SEND_REPLY_MESSAGE_V2, requestHeaderV2);
} else {
request = RemotingCommand.createRequestCommand(RequestCode.SEND_REPLY_MESSAGE, requestHeader);
}
} else {
if (sendSmartMsg || msg instanceof MessageBatch) {
SendMessageRequestHeaderV2 requestHeaderV2 = SendMessageRequestHeaderV2.createSendMessageRequestHeaderV2(requestHeader);
request = RemotingCommand.createRequestCommand(msg instanceof MessageBatch ? RequestCode.SEND_BATCH_MESSAGE : RequestCode.SEND_MESSAGE_V2, requestHeaderV2);
} else {
request = RemotingCommand.createRequestCommand(RequestCode.SEND_MESSAGE, requestHeader);
}
}
request.setBody(msg.getBody());
switch (communicationMode) {
case ONEWAY:
// 单向发送
this.remotingClient.invokeOneway(addr, request, timeoutMillis);
return null;
case ASYNC:
// 异步发送
final AtomicInteger times = new AtomicInteger();
long costTimeAsync = System.currentTimeMillis() - beginStartTime;
if (timeoutMillis < costTimeAsync) {
throw new RemotingTooMuchRequestException("sendMessage call timeout");
}
this.sendMessageAsync(addr, brokerName, msg, timeoutMillis - costTimeAsync, request, sendCallback, topicPublishInfo, instance,
retryTimesWhenSendFailed, times, context, producer);
return null;
case SYNC:
// 同步发送
long costTimeSync = System.currentTimeMillis() - beginStartTime;
if (timeoutMillis < costTimeSync) {
throw new RemotingTooMuchRequestException("sendMessage call timeout");
}
return this.sendMessageSync(addr, brokerName, msg, timeoutMillis - costTimeSync, request);
default:
assert false;
break;
}
return null;
}
|
- 生成消息的载体对象 RemotingCommand,该对象存储这和其他服务交互的传输数据信息。
- 又根据发消息的类型区分同步、异步、单向三种方式,调用具体的实现。
- 单向调用 remotingClient.invokeOneway()实现。
- 异步调用 this.sendMessageAsync() 实现。
- 同步调用 this.sendMessageSync() 实现。
单向发送消息 NettyRemotingClient.remotingClient.invokeOneway()
 1
 2
 3
 4
 5
 6
 7
 8
 9
10
11
12
13
14
15
16
17
18
19
20
|
@Override
public void invokeOneway(String addr, RemotingCommand request, long timeoutMillis) throws InterruptedException,
RemotingConnectException, RemotingTooMuchRequestException, RemotingTimeoutException, RemotingSendRequestException {
// 获取发送消息的 Channel,Netty 的对象
final Channel channel = this.getAndCreateChannel(addr);
if (channel != null && channel.isActive()) {
try {
doBeforeRpcHooks(addr, request);
// 单向发送消息
this.invokeOnewayImpl(channel, request, timeoutMillis);
} catch (RemotingSendRequestException e) {
log.warn("invokeOneway: send request exception, so close the channel[{}]", addr);
this.closeChannel(addr, channel);
throw e;
}
} else {
this.closeChannel(addr, channel);
throw new RemotingConnectException(addr);
}
}
|
this.invokeOnewayImpl(channel, request, timeoutMillis)
 1
 2
 3
 4
 5
 6
 7
 8
 9
10
11
12
13
14
15
16
17
18
19
20
21
22
23
24
25
26
27
28
|
public void invokeOnewayImpl(final Channel channel, final RemotingCommand request, final long timeoutMillis)
throws InterruptedException, RemotingTooMuchRequestException, RemotingTimeoutException, RemotingSendRequestException {
request.markOnewayRPC();
// 使用信号量控制并发
boolean acquired = this.semaphoreOneway.tryAcquire(timeoutMillis, TimeUnit.MILLISECONDS);
if (acquired) {
final SemaphoreReleaseOnlyOnce once = new SemaphoreReleaseOnlyOnce(this.semaphoreOneway);
try {
// 异步发送消息,Netty交互
channel.writeAndFlush(request).addListener(new ChannelFutureListener() {
@Override
public void operationComplete(ChannelFuture f) throws Exception {
once.release();
// 发送完成回调处理
if (!f.isSuccess()) {
log.warn("send a request command to channel <" + channel.remoteAddress() + "> failed.");
}
}
});
} catch (Exception e) {
once.release();
log.warn("write send a request command to channel <" + channel.remoteAddress() + "> failed.");
throw new RemotingSendRequestException(RemotingHelper.parseChannelRemoteAddr(channel), e);
}
} else {
// 获取信号量超时处理...
}
}
|
- 至此发送单向消息完成,这里就是使用 netty 和其他服务交互了,不再深入。
- 可以看到使用 channel.writeAndFlush() 异步发送消息,新增了一个监听器,发送失败会打印告警日志。
- 单向发送并没有关心返回值。
- 使用信号量 Semaphore 控制并发。
同步发送
在前面的分析中,三种发消息的代码都是公用的,在 MQClientAPIImpl.sendMessage() 中才有不同的分支。
同步发送开始 MQClientAPIImpl.sendMessageSync()
1
2
3
4
5
6
7
8
9
10
11
12
13
|
private SendResult sendMessageSync(
final String addr,
final String brokerName,
final Message msg,
final long timeoutMillis,
final RemotingCommand request
) throws RemotingException, MQBrokerException, InterruptedException {
// 发送消息
RemotingCommand response = this.remotingClient.invokeSync(addr, request, timeoutMillis);
assert response != null;
// 处理返回结果
return this.processSendResponse(brokerName, msg, response,addr);
}
|
可以看到在底层交互的对象请求和接收都封装在了同一个对象 RemotingCommand 中。
this.remotingClient.invokeSync(addr, request, timeoutMillis)
 1
 2
 3
 4
 5
 6
 7
 8
 9
10
11
12
13
14
15
16
17
18
19
20
21
|
@Override
public RemotingCommand invokeSync(String addr, final RemotingCommand request, long timeoutMillis)
throws InterruptedException, RemotingConnectException, RemotingSendRequestException, RemotingTimeoutException {
long beginStartTime = System.currentTimeMillis();
final Channel channel = this.getAndCreateChannel(addr);
if (channel != null && channel.isActive()) {
try {
doBeforeRpcHooks(addr, request);
long costTime = System.currentTimeMillis() - beginStartTime;
if (timeoutMillis < costTime) {
throw new RemotingTimeoutException("invokeSync call timeout");
}
// 执行发送消息
RemotingCommand response = this.invokeSyncImpl(channel, request, timeoutMillis - costTime);
doAfterRpcHooks(RemotingHelper.parseChannelRemoteAddr(channel), request, response);
return response;
} catch (RemotingSendRequestException e) {
//
}
}
}
|
this.invokeSyncImpl()
 1
 2
 3
 4
 5
 6
 7
 8
 9
10
11
12
13
14
15
16
17
18
19
20
21
22
23
24
25
26
27
28
29
30
31
32
33
34
35
36
37
|
public RemotingCommand invokeSyncImpl(final Channel channel, final RemotingCommand request,
                                      final long timeoutMillis)
  throws InterruptedException, RemotingSendRequestException, RemotingTimeoutException {
  final int opaque = request.getOpaque();

  try {
    // 构建返回对象,实例化 countDownLatch
    final ResponseFuture responseFuture = new ResponseFuture(channel, opaque, timeoutMillis, null, null);
    this.responseTable.put(opaque, responseFuture);
    final SocketAddress addr = channel.remoteAddress();
    // 使用 nettyClient 异步发送消息。
    // 但需求是要返回值,要这里用到 countDownLatch,等到有返回结果才结束。
    // RemotingCommand responseCommand = responseFuture.waitResponse(timeoutMillis); ->  this.countDownLatch.await(timeoutMillis, TimeUnit.MILLISECONDS); 这里主线程等到子线程返回
    // responseFuture.putResponse(null); -> this.countDownLatch.countDown(); 结束等到,接续执行
    channel.writeAndFlush(request).addListener(new ChannelFutureListener() {
      @Override
      public void operationComplete(ChannelFuture f) throws Exception {
        if (f.isSuccess()) {
          responseFuture.setSendRequestOK(true);
          return;
        } else {
          responseFuture.setSendRequestOK(false);
        }

        responseTable.remove(opaque);
        responseFuture.setCause(f.cause());
        responseFuture.putResponse(null);
        log.warn("send a request command to channel <" + addr + "> failed.");
      }
    });
    // 同步等等返回结果
    RemotingCommand responseCommand = responseFuture.waitResponse(timeoutMillis);
    return responseCommand;
  } finally {
    this.responseTable.remove(opaque);
  }
}
|
1
2
3
4
|
public void putResponse(final RemotingCommand responseCommand) {
  this.responseCommand = responseCommand;
  this.countDownLatch.countDown();
}
|
1
2
3
4
|
public RemotingCommand waitResponse(final long timeoutMillis) throws InterruptedException {
  this.countDownLatch.await(timeoutMillis, TimeUnit.MILLISECONDS);
  return this.responseCommand;
}
|
- 发消息给 broker 都一样,都是异步的。
- 但这里使用了 CountDownLatch 等待异步线程返回,这里是和单向发送消息最大的不同。
- 总体是同步的。
Broker 负载均衡源码
Producer 发送消息给Topic时,会选择一个MessageQuence, 默认的负载均衡算法是轮询,每个qucence大致平均分配。
 1
 2
 3
 4
 5
 6
 7
 8
 9
10
11
12
|
private SendResult sendDefaultImpl(
    Message msg,
    final CommunicationMode communicationMode,
    final SendCallback sendCallback,
    final long timeout
  ) throws MQClientException, RemotingException, MQBrokerException, InterruptedException {

	  //...
    // 选择一个MessageQueue
    MessageQueue mqSelected = this.selectOneMessageQueue(topicPublishInfo, lastBrokerName);
    //...
}
|
默认情况下最终调用下面方法,每个线程第一访问时,会随机取一个整型值,每次对该值加1取绝对值后对quence的数量取模。
1
2
3
4
5
6
7
|
public MessageQueue selectOneMessageQueue() {
  int index = this.sendWhichQueue.incrementAndGet();
  int pos = Math.abs(index) % this.messageQueueList.size();
  if (pos < 0)
    pos = 0;
  return this.messageQueueList.get(pos);
}
|
Broker 接收消息及刷盘持久化源码
待补充
Consumer 推模式源码
推模式实时性高,但占用网络资源多。
Consumer 拉模式源码
拉模式可以批量消费,实时性不高,但能减少网络带宽。
RocketMQ 对比其他MQ
- RabbitMQ 安全性高,可靠性高,但吞吐量低。
- Kafka 性能高,但功能单一,且可能会丢消息。
- RocketMQ 性能高,功能全,几乎全场景都能使用。
RocketMQ 常见问题
-
如何保证消息不丢失?
- MQ服务正常时,生产者端采用同步发送、同步刷盘、同步同步发给从节点,消费者端消费失败自动重试。
- MQ服务挂掉时,把消息在暂时存入Redis,等MQ服务恢复后再发给MQ。
-
如何保证消息有序?
- 局部有序:生产者这段把需要保证有序的消息发在同一个队列,消费者端一个队列只绑定一下消费者。
- 全局有序:所有消息只有有一个队列,性能很低。
-
如何处理消息积压?
- 当队列多时:增加消费者提高消费的效率。
- 当队列少时:创建一个队列多的Topic,迁移消息,再增加消费者消费。
 telzhou618 收录于 中间件